Homemade Cream Cheese Recipe: Simple and Delicious
Homemade cream cheese is a versatile and creamy dairy product that can be used in a wide range of sweet and savory dishes. While store-bought cream cheese is readily available, making your own from scratch can be rewarding and delicious. I’ll guide you through the process of making cream cheese from scratch using just a few basic ingredients. With a little time and patience, you can create a fresh and delicious cream cheese that’s perfect for spreading on bagels, using in cheesecakes, or incorporating into various recipes.
Jump to Recipe
This post contains affiliate links
For whatever reason cream cheese was a challenge for me to get just right. I read cheesemaking books and tried various methods but the results were often less than desirable. I had some turn out too runny, some turned out gritty, and some tasted like cottage cheese. However, I was determined to make it! We have a cow and by golly, I want to make my own dairy products! Thankfully, I finally got it just right! Even my five-year-old accepts this cream cheese and likes it! He is a cream cheese fanatic! He turned up his nose at many of my previous attempts!
Disclaimer: While very tasty, this is different than store-bought cream cheese. The consistency is different and the flavor is richer. I won’t claim one is better than the other, that is just personal preference. The flavor of homemade cream cheese is definitely fresher and has more depth. It does not have the shiny ultra smooth consistency of store-bought.
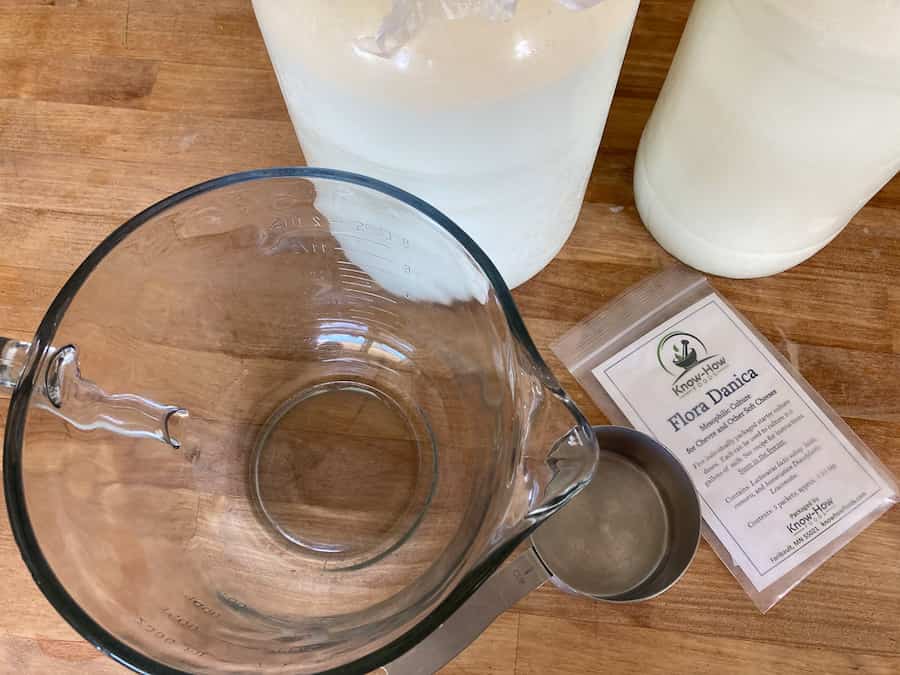
Ingredients:
- 2 cups of milk (whole milk is best, I use raw milk)
- 2 cups of heavy cream
- 1/8 tsp mesophilic starter culture, I have also used this brand
- 1/4-1/2 tsp salt (adjust to taste, I like 1/2tsp)
Equipment:
- Large, heavy-bottomed saucepan
- Thermometer
- Whisk or spoon
- Cheesecloth or a clean kitchen towel
- Fine-mesh strainer or cheese press
- Mixing bowl
The Process for Making Cream Cheese from Scratch
This is truly simple to make, it just takes time. However, the time is not hands-on, it’s just waiting time. This recipe yields close to 2 cups.


Instructions:
- Sterilize Your Equipment: Before you begin, it’s essential to ensure that all your equipment is thoroughly clean and sterilized. This helps prevent the growth of unwanted bacteria during the cheese-making process.
- Heat the Milk and Cream: In a large, heavy-bottomed saucepan, combine the 2 cups of milk and 2 cups of heavy cream. Heat the mixture over low to medium heat, stirring frequently to prevent scorching, until it reaches a temperature of around 85°F (29°C). Use a thermometer to monitor the temperature accurately.
- Add the Mesophilic Starter: Once the milk and cream mixture has reached the desired temperature, remove it from the heat. Sprinkle the 1/8 tsp of mesophilic starter culture evenly over the surface of the mixture. Allow it to rehydrate for a minute or two.
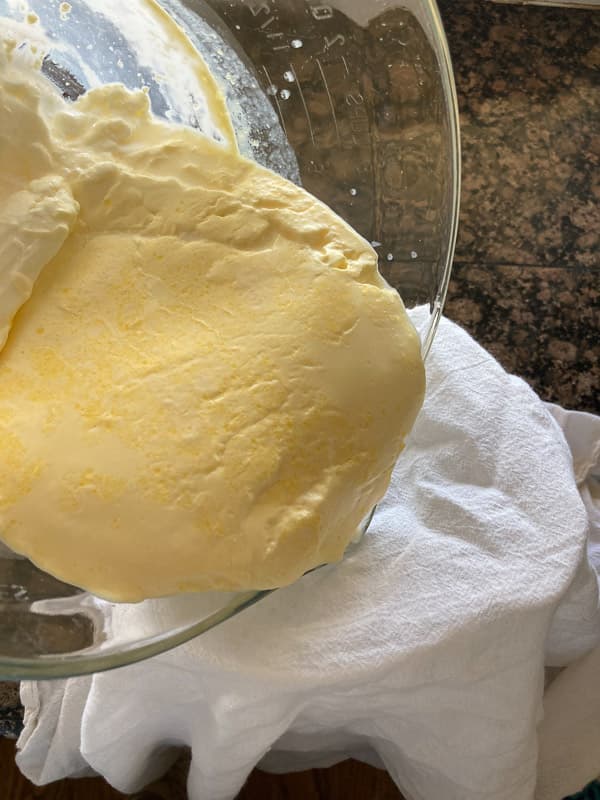
- Mix and Let It Rest: Gently whisk the mesophilic starter into the milk and cream mixture until it’s well incorporated. Cover the saucepan and let it sit undisturbed at room temperature for about 12-24 hours. During this time, the mixture will thicken and develop a slightly tangy flavor. It really depends on the temperature of your home. Mine takes every bit of 12 hours and I often have to let it go for 18. It looks a lot like yogurt when it is ready.
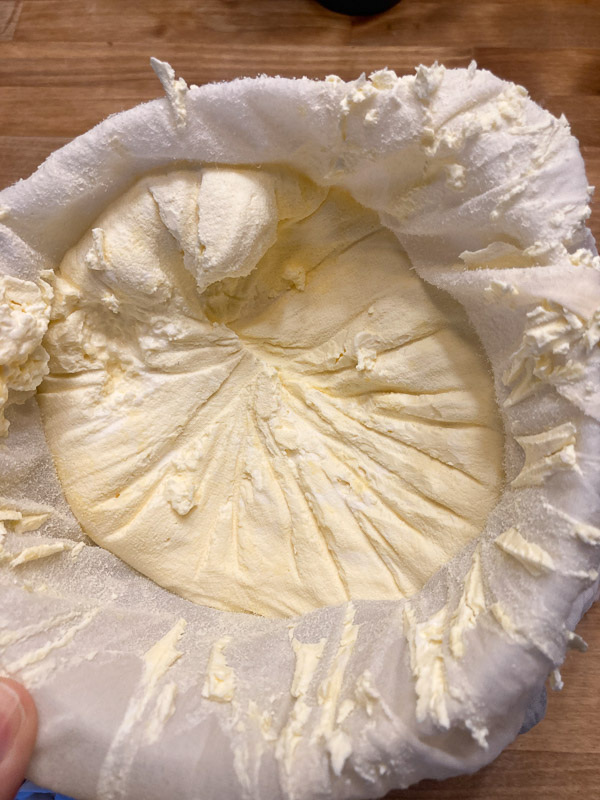
- Drain the Curds: After the incubation period, you’ll notice that the mixture has thickened and formed curds. Line a fine-mesh strainer with cheesecloth or a clean kitchen towel, and place it over a mixing bowl. Carefully pour the curds and whey into the strainer.
- Let It Drain: Gather the corners of the cheesecloth or towel and tie them together to create a pouch. Hang the pouch over a bowl or place it in a colander set over a bowl. Allow the curds to continue draining for at least 6-12 hours. You can leave it on the counter or transfer it to the fridge. It will be tangier if you leave it out on the counter. I like putting mine in a cheese press so it’s as thick as possible. I use an inexpensive plastic one and I don’t put much weight on top. However, it’s not necessary. The longer you let it drain, the thicker your cream cheese will be. Once I put it in the press, I stick it in the fridge overnight. In the morning it is the perfect consistency.
- Salt and Flavor: Sprinkle 1/4-1/2 tsp of salt over the drained curds, or adjust the amount to your taste. If desired, you can also add herbs, spices, or other flavorings at this stage. Gently mix the salt and flavorings into the cream cheese. You might notice some lumps, but that’s just the cream, I use a fork to mix it up with the salt and that helps the consistency to be smoother.
- Enjoy Your Homemade Cream Cheese: Once your cream cheese has reached the desired consistency, transfer it to an airtight container and store it in the refrigerator. Your homemade cream cheese is now ready to be used in your favorite recipes or spread on bagels and toast. Personally, I have found that I love homemade cream cheese on my scrambled eggs in the morning, add tomatoes and olives and it is so yummy!

Homemade Cream Cheese with Raw Milk
Equipment
- 1 Heavy bottom saucepan
- 1 Digital Thermometer
- 1 whisk
- 1 Cheesecloth
- 1 Mesh Strainer
- 1 Mixing bowl
Ingredients
- 2 cups milk I use whole raw
- 2 cups heavy cream
- ⅛ tsp mesophilic starter
- ¼-½ tsp salt adjust to taste
Instructions
- Using clean sterilized equipment, heat the milk and cream in a large heavy-bottomed saucepan, combine the milk and cream. Heat over low to medium heat and stir to prevent scorching. Temperature should reach 85℉ (29℃). Remove from heat and add the mesophilic starter by sprinkling it over the surface.Allow it to rehydrate for a minute or two and then mix in with a whisk. Cover the saucepan and let it sit undisturbed at room temperature for 12-24 hours. 18 seems to work best for me. It looks like thick yogurt when it is ready.Drain the curds. Line a fine mesh strainer with cheesecloth or a floursack kitchen towel. Place it over a mixing bowl and carefully pour into the strainer. Let it drain: Tie up the ends with some string and hang it over a bowl to allow it to drain for at least 6 hours. I use an inexpensive cheese press and put it in the fridge to ensure it is very thick. Add salt: after it has reached the desired consistency, add the salt and mix with a fork. Enjoy!

Love homemade dairy products? Check out these posts!
Making cream cheese from scratch at home is a rewarding process that allows you to enjoy a fresh, creamy, and flavorful product that you can customize to your liking. With just a few simple ingredients and some patience, you can create delicious homemade cream cheese. Give it a try, and savor the taste of your homemade cream cheese!


Is there a substitute for mesophilic starter? I want to try this recipe but I never heard of this. Do you know if this is natural or is it something usual for cheese making?
For this recipe mesophilic starter is a must. You can purchase it through Amazon, it is linked. You can also search the web for cream cheese recipes using things like lemon juice or vinegar. Personally I have never liked how those turned out. The starter gives it the most authentic flavor. Most cheesemaking will require a starter or rennet.
what is the yield???
It is usually about half the yield of ingredients. So approximately 2 cups.
Tried this for the first time this weekend! Tastes
Mine end result only yielded about 1/2 cup. Any suggestions/tips? If I added more of the culture would it give me more curds? I let it sit about 18 hours! Thanks!
I am not sure why your yield would be so small. You can figure that your yield will be about half of your original amounts. I suppose you could try a tiny bit more culture but I don’t know for sure. Did you use raw milk or pasturized milk?
I want to try this, but I have one question: should I definitely use whole milk? I ask because my family and I drink skim, but I will definitely use whole if I need to.
Yes, the cream is important!
You weren’t kidding – mine finished the other day, and the cream seems to have made all the difference! My kids loved it on their bagels this morning!
“Let it drain: Tie up the ends with some string and hang it over a bowl to allow it to drain for at least 6 hours. I use an inexpensive cheese press and put it in the fridge to ensure it is very thick.”
Do you use the cheese press immediately or after you have drained on the counter for a period of time?
I let it drain for a period of time, until it isn’t dripping. Then I put it in the fridge.